Seerr
Seerr is a media request management platform — the combined successor to Overseerr and Jellyseerr. It supports both Plex and Jellyfin and lets you and your users search for movies and TV shows and request them. CLI_Debrid picks up approved requests automatically and downloads them.
Formerly Overseerr / Jellyseerr
Overseerr and Jellyseerr have merged into a single project called Seerr. The configuration is the same — only the name has changed. See docs.seerr.dev for the latest documentation.
Prerequisites
- Seerr installed and running
- CLI_Debrid installed and configured
- Plex libraries synced in Seerr (so it knows what you already have)
Step 1 — Install Seerr
If you don't have Seerr installed yet:
Search for Seerr in Community Applications and install the lscr.io/linuxserver/seerr template. The default port is 5055.
Access Seerr at http://YOUR_SERVER_IP:5055 and complete its setup wizard.
Step 2 — Connect Seerr to Plex
In Seerr, go to Settings → Plex:
- Enter your Plex server URL:
http://YOUR_PLEX_IP:32400 - Enter your Plex token (see Finding your Plex token)
- Click Save Changes
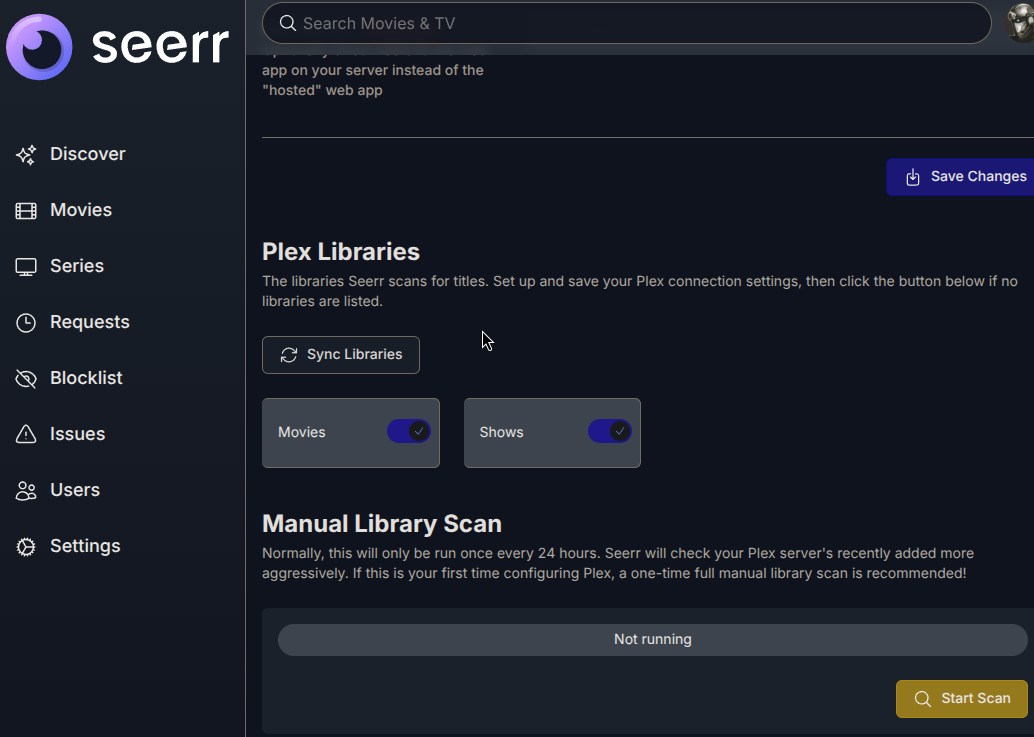
Step 3 — Sync all libraries
Still in Settings → Plex:
- Click Sync Libraries
- Wait for all libraries to appear — including
Movies-DBandTV Shows-DB -
Check all libraries
Check your Debrid libraries too
Checking all libraries — including your Debrid ones — means Seerr will show content as Available if it's already in your library. This prevents users from requesting something you already have.
-
Click Save Changes
- Click Start Scan and let it complete
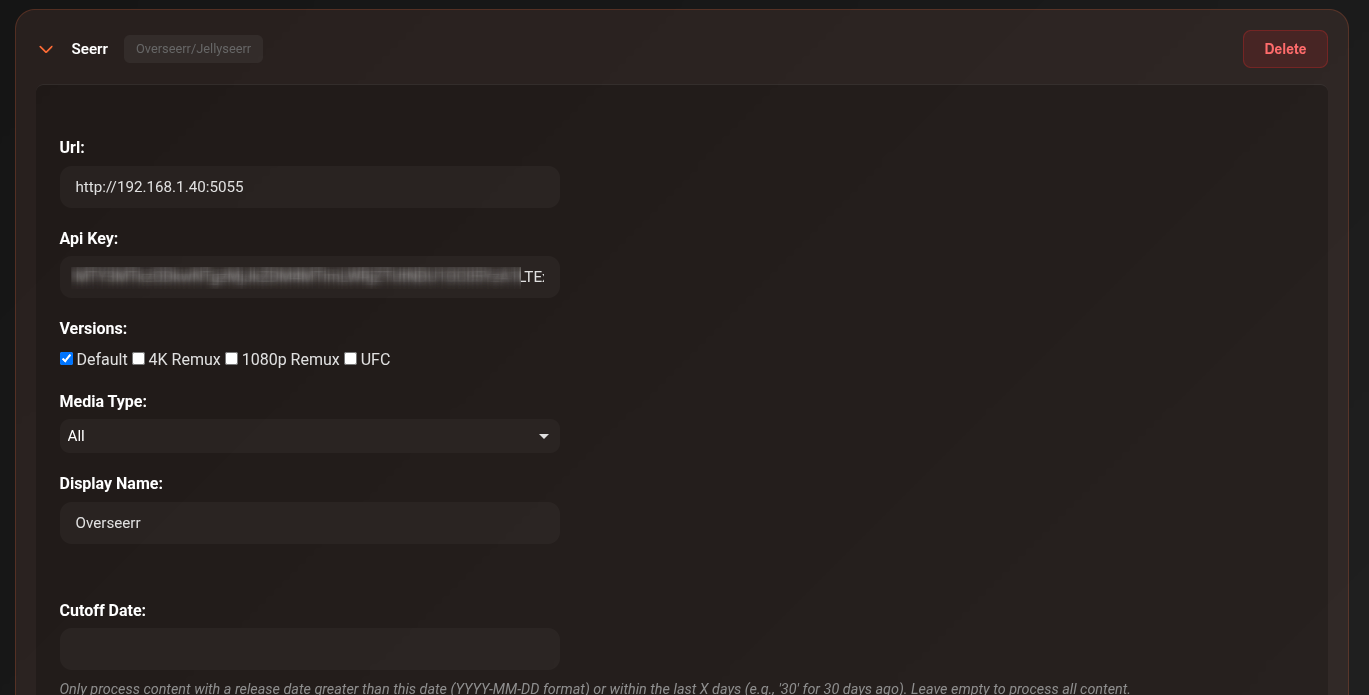
Step 4 — Add Seerr as a CLI_Debrid content source
In CLI_Debrid, go to Settings → Content Sources:
- Click Add New Source → select Seerr
- URL:
http://YOUR_SEERR_IP:5055 - In Seerr go to Settings → General → copy the API Key
-
Paste into the API Key field in CLI_Debrid
Check the API key carefully
Compare what you pasted against what's shown in Seerr. Extra
=signs at the end will cause authentication failures. -
Requesters (optional): Check which Seerr users this source should process. Leave All users (normal behavior) checked to process every request. See Per-user version routing for multi-source setups.
- Set Plex Label Mode to
requesterif you want items labelled by who requested them - Click Save Settings
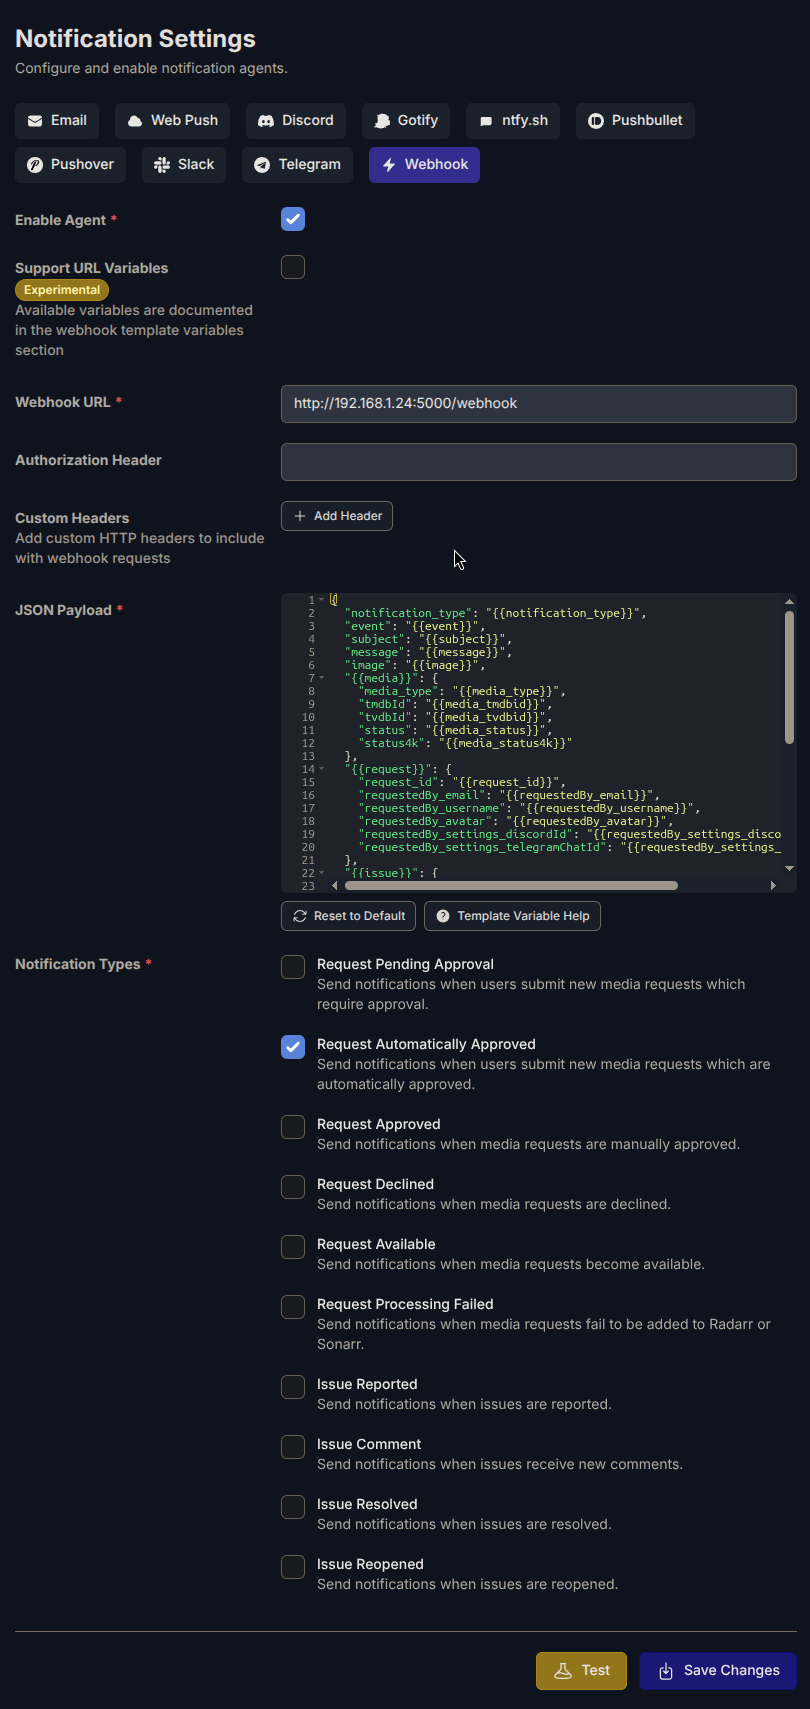
Step 5 — Configure the webhook (recommended)
By default, CLI_Debrid checks Seerr on its normal processing cycle (~60 seconds). The webhook makes approved requests get picked up within seconds.
In Seerr, go to Settings → Notifications → Webhook:
| Setting | Value |
|---|---|
| Webhook URL | http://YOUR_CLI_DEBRID_IP:5000/webhook |
| Enabled | ☑ On |
| Notification Types | ☑ Request Approved |
Click Test — you should see a success message. Then click Save Changes.
Step 6 — Test it
- Start CLI_Debrid (click ▶ in the top right)
- In Seerr, search for a movie you don't currently have
-
Click Request

-
The request appears on the Requests page with status Pending or Approved (depending on your user settings)
- CLI_Debrid will pick it up within seconds (webhook) or within ~60 seconds (polling)
- Monitor progress in CLI_Debrid under Main → Queues
- Once downloaded, the request status in Seerr changes to Available
User permissions
In Seerr you control what each user can do:
| Permission | Description |
|---|---|
| Auto-Approve | User's requests are approved automatically without admin review |
| Request | User can request but admin must approve |
| Auto-Request from Watchlist | Seerr automatically requests whatever is on the user's Plex watchlist |
Configure per-user under Users → [username] → Edit.
Per-user version routing
You can configure multiple Seerr content sources in CLI_Debrid — one per version profile — and restrict each source to specific requesters. This lets different users get different quality versions automatically.
Example setup:
| Source | Versions | Requesters |
|---|---|---|
| Seerr (Default) | Default | All users (normal behavior) |
| Seerr (1080p Remux) | 1080p Remux | alice, bob |
| Seerr (4K Remux) | 4K Remux | admin |
How to configure:
- In CLI_Debrid, go to Settings → Content Sources
- Add a separate Seerr source for each version profile
- On each source, expand Requesters — a checkbox list loads from your Seerr instance
- Check the specific users whose requests this source should handle
- Leave All users (normal behavior) checked on your default source
One source per version group
Each user group that needs a different version preference should have its own content source. A request from a user matched to multiple sources will be added once per matching source — each with its own version.
Already-collected items
If the requested item is already collected in a different version, CLI_Debrid will add it as a new Wanted entry for the requested version. If the same version is already collected, the request is skipped as expected.
Ignore tags
If you use Seerr tags to categorize requests, you can tell CLI_Debrid to skip certain tagged requests:
In the Seerr content source settings in CLI_Debrid, set Ignore Tags to a comma-separated list of tag names to skip.
For example: low-priority, test — requests with either of these tags will be ignored.
Troubleshooting
Requests not being picked up by CLI_Debrid
- Check the Seerr content source is enabled in CLI_Debrid settings
- Verify the URL and API key are correct
- Test the webhook — go to Seerr → Settings → Notifications → Webhook → Test
Content showing as "Available" in Seerr immediately
- This is correct behaviour — Seerr found the item in one of your synced Plex libraries
- If it's a false positive, check if you have a duplicate in another library
Requests staying as "Pending" instead of "Approved"
- The requesting user doesn't have Auto-Approve permission
- Go to Users and grant Auto-Approve, or manually approve requests from the Requests page